PvP and PvP Arena, is a term that scares a lot of people away from trying this very intoxicating and immensly fun part of Guild Wars 2.
Structured PvP (SPVP) is a Player versus Player mode which allows competition on an even footing. Everyone has the same gear and weapons, which are freely accessible from vendors there, as well runes/sigils for tweaking your playstyle.
The catch is that they can of course only be used in the mists. However any bags and dyes you get, will be usuable in PvE.
You can start playing sPvP with your Veteran friends seconds after entering your game for the first time, as there is no level in SPVP.
Getting to Heart of the Mists
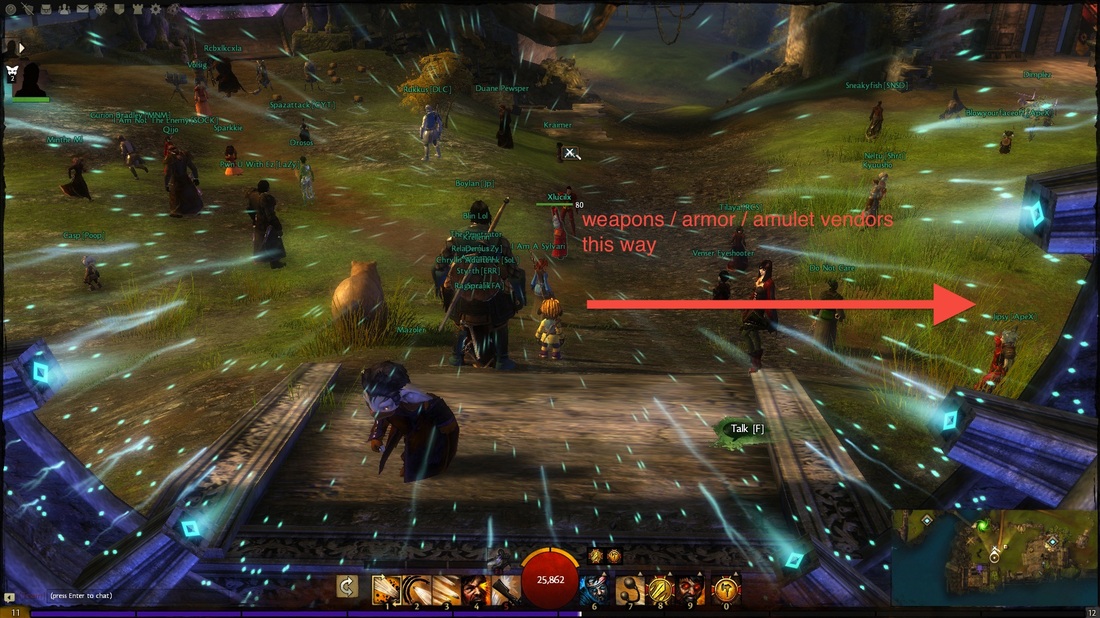
All Structured PvP activities are reachable via the Heart of the Mists which is an area of the game you can access by clicking the crossed sword icon at the top of your screen and then the Go To The Mists Button on that panel.
The first time you're in there you'll have a tutorial encounter, but you can skip that by running up the broken staircase and through the portal at the top. Once through that, you can go get alternative weapons and runes by going to the vendors on your right hand side.
Structured PvP (SPVP) is a Player versus Player mode which allows competition on an even footing. Everyone has the same gear and weapons, which are freely accessible from vendors there, as well runes/sigils for tweaking your playstyle.
The catch is that they can of course only be used in the mists. However any bags and dyes you get, will be usuable in PvE.
You can start playing sPvP with your Veteran friends seconds after entering your game for the first time, as there is no level in SPVP.
Getting to Heart of the Mists
All Structured PvP activities are reachable via the Heart of the Mists which is an area of the game you can access by clicking the crossed sword icon at the top of your screen and then the Go To The Mists Button on that panel.
The first time you're in there you'll have a tutorial encounter, but you can skip that by running up the broken staircase and through the portal at the top. Once through that, you can go get alternative weapons and runes by going to the vendors on your right hand side.
The Two Game Modes of SPVP
There are two primary modes of play: Tournament and Hot Join Play.
Tournament mode allows you to enter with a Team (as a group), but you can also sign up for Tournament play solo. If you win a Tournament match, you get a loot chest with gear, just for the looks.
This mode is always 5 vs 5, and you always join a new game.
.
Hot Join Play mode does not reward a chest on victory, but joining is almost instant.
This mode can be anything from 1 vs 1 to 8 vs 8. Unlike Tournament play, you can join a game in progress.
This mode also rotates a few extra maps.
The Objective of sPvP
Two teams of five to eight players are matched up against each other.
The objective is to be the first team to reach 500 points. Points are awarded through holding capture points and kills. There are 3 capture points on the map, and when captured, each location grants one point every two seconds.
Each player kill grants five points.
If neither team reaches 500 points, the team with the most points will be declared the winner after the 15 minute time limit.
The average time for a game is 8-13 minutes, depending on the balance of the teams contesting.
The Maps

The Battle Of Kyhlo (Bonus Feature: Trebuchet your foes from range)
The battle takes place in a town which means that unless players stay on the high ground, their opponents can use the obstructing buildings as a cover as they move around the map, and also allows players to ambush their opponents with little effort. The outer capture points are quite open and they have only two entrances, but are still easy to reach by the cover of buildings. The center point is located up in the Clocktower, and can be accessed either from the inside or by using the wooden ramps on the either side of the tower.
Both team can use their trebuchets to destroy outer walls of the tower or to remove obstracles from the town to create new passages. The trebuchet deals severe damage and is capable of not only effectively sieging the capture points, but also virtually any other area of the map, so if the enemy team has a dedicated siege weapon user, it's usually best to take them and the trebuchet
out quickly or at least harass them to give your team a chance to fight without constant barrage.
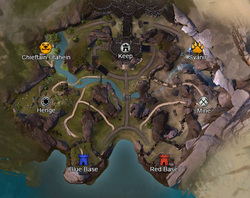
Forest of Niflhel (Bonus feature : Kill the NPC's for 50 extra points)
The various paths of the forest are what makes this map interesting. It is usually very easy to access any of the capture points by using the paths, especially since the paths are largely obstructed from view from the more open areas. The upper path which runs behind the Keep allows both teams to quickly get to either of the NPC bosses to claim their buffs, or to assault the Keep from above. Similiarly, the southern path, while being more open, allows players to quickly reach either the Mine or the Henge, though they can be spotted when running past the opposing side's base.
Your team can score extra points on this map by killing one or both of the NPC's on this map located in the north-western and north-eastern corner. The kill grants your team 25 points and a short-time buff (+50 to all stats). The points are rewarded on the last hit, so it's possible to steal a kill from the other team!
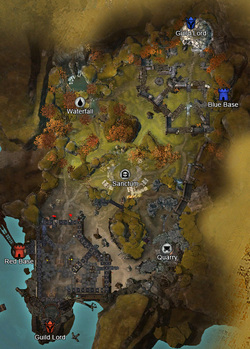
Legacy of the Foefire (Bonus feature: Kill the Keep Lords for 150 points!)
The map and objective are quite straightforward; unless either team decides to break into each other's keeps, it's usually best to stick to capturing and fighting for control of the capture points.
Since both outer points are located on the opposite sides of the Graveyard, whichever team possesses better fighting ability can quickly gain the upper hand in battle. However, the deck is mixed when either side attacks the opposing keep. Two or even one capable player can take down either of the gates to the keep, along with all of the NPCs. If you know your keep is being sieged and there is nobody going to stop them, it's often a good idea to fall back and assault to besiegers before they can kill your lord, or at least before they can leave the fortress and flank your team.
NPC guards and 'guild lords' spawn at the beginning of each match in the starting zones of their respective team. In order to get to the guild lord, the enemy team has to take down a wall first. Walls can only be damaged by direct damage. Defeating the Lord grants 150 points.
The usual strategy is to get to 350 points then kill the other teams Lord, thus winning the map. You really can't afford to get too cocky on this map.

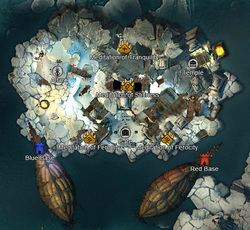
Raid on the Capricorn (Bonus feature: Central Cannon and SHARKS IN THE WATER !!!)
Much of this map is covered in water, and thus underwater mode combat is necessary. However, it is still possible to avoid the water and hostile sharks altogether, either by skirting along the waterline or by passing through the ship in the middle of the map. Capturing the Ruins allows you and your team rapid access through the map without needing to worry about the sharks, and staying in the water guarding the Ruins can prove an advantegous strategy to slow down enemies' advance.
The map is quite open in layout, meaning that you can spot opponents far away, though both east and west control points have either a rocky cliff or dock buildings to cover either team's approach to those points, so it's a good idea to keep an eye on the opponent's side of the shore while in water. The cannon positioned at the south of map can be used to attack both east and west capture points; it is capable of dealing heavy damage, but requires cannonballs found in
the ship to operate.
Hostile sharks roam the waters of the map, but when a team captures the Ruins point they turn friendly towards them and will attack the opposing team.
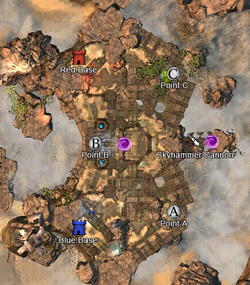
Skyhammer (Bonus feature: Zap your foes using the orbital Skyhammer Cannon)
Sky Hammer is an arena filled with tricks that favor the nimble and the savvy. There are many jump pads to throw you up onto platforms, and glass panels on the floor to break and push your enemies down. It's fast paced mayhem that leads to the occasional accidental suicide. Perfect!!!
Both sides will need to keep a close eye on the floating cannon also. Whoever controls it will rain death on the enemy.
Either team can access the Skyhammer Cannon. Players can access the cannon's room through the Skyhammer Access Gate in the center of the map. Interacting with the gate causes an effect, preventing passage through the gate for a brief time.
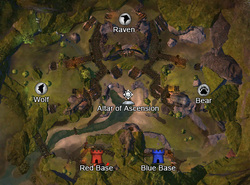
Spirit Watch (Bonus feature: Score Extra points by taking the orb to any base)
Aside from capturing the bases, this map features orb scoring.
To score orb, Capture the Orb of Ascension and bring it to any of the three shrines for bonus points. The Orb spawns at an altar in the center of the map. It can be picked up through a short commune. The Orb of Ascension is rather heavy and will slow you down significantly (40%) — it also prevents stealth and swiftness. Carriers drop the orb if teleportation or invulnerability abilities are used.
The Orb must be taken to one of the three capture points; the altars of the Wolf, Raven & Bear, which are located on the surrounding cliffs. If the capture point is owned by the Orb carrier's team, they score 30 points; if not, they score 15 points. Bringing an orb to an enemy point instantly neutralizes the point. The orb resets to the altar 10 seconds later. Players that have been downed or teleport immediately drop the orb.
A few orb carrying notes:
Players carrying the Orb can increase their movement speed through traits or passive signet effects.
Players can use transformation abilities, such as the necromancer's elite skill Plague, without dropping the Orb.
Players can use leap and retreat skills without dropping the Orb
Temple of the Silent Storm (Bonus feature: Meditations that affect your point scoring speeed).
The map is riddled with elevation differences, especially in the center area where Meditation of Stillness can be found; Jumping off the ledge will take you to a large cave with water that also contains the Meditation of Tranquility and exit to the south which leads to the Gate capture point. The various ramps and cliffs in the map make losing opponents and prowling around the map for easy caps a worthwhile effort. Four 'meditations' spawn periodically through the map. After completing the channelling for each meditation, the respective team acquires the buff granted by that meditation.
Meditation of Ferocity (south-west and south-east) gives Bonus +3 team points when anyone on your team earns a kill. There are 2 of these buffs; one on each team’s side of the map and are stackable.
Meditation of Stillness (center) Controlled capture points award double points.
Spawns at 11:30, 8:30, 5:30 and 2:30, game clock.
Meditation of Tranquility (north) Acquires all three capture points for your team.
Spawns at 8:30 and 2:30, game clock.
